A pair of scissors can look right and still feel wrong for the job. Long blades may be useful on a length of fabric but awkward around a small paper shape. A kitchen pair may be easy to wash but too broad for fine grooming work. Start with the task you do most often, then choose the shape, size and handle that help you control that task.
Our LIVINGO range covers sewing, food preparation, everyday household cutting, children's crafts and personal care. This guide helps you make a practical shortlist. You do not need every kind of scissors in the drawer. You need a suitable pair where you actually work, a way to keep it clean and a safe place to put it when you finish.
1. Start with what you cut
Think about your last three cutting jobs. Were they opening a package, trimming a ribbon and wrapping a gift? An all-purpose pair is a sensible place to start. Were they cutting pattern pieces, shortening a hem and preparing quilt blocks? Choose fabric shears and keep them with your sewing supplies. If most jobs happen over a chopping board, look at kitchen scissors instead.
This simple distinction matters more than the color of the handle. A tool's shape, blade length and cleaning method should suit its main job. It also helps you avoid paying attention to a feature you will rarely use. A locking poultry shear solves a different problem from a small pointed craft pair, even though both have two cutting edges.
Separate tools are useful when materials leave different kinds of residue. Tape adhesive does not belong on a pair used for food. Fabric scissors are easier to keep ready when they are not passed around for household packaging. Personal-care scissors should have their own place in a grooming kit. Organizing by task can be as simple as keeping each pair in the drawer where the job happens.
| What you work with | Start with | Look closely at |
|---|---|---|
| Fabric and sewing patterns | Fabric shears | Handle shape, overall size, cutting stroke |
| Paper, wrapping and light crafts | All-purpose scissors | Grip, blade coating, number of pairs |
| Food preparation | Kitchen shears | Cleaning access, grip and storage lock |
| Children's paper crafts | Kids scissors | Handedness, tip shape and supervision |
| Small grooming details | Personal-care scissors | Tip curve, blade profile and control |
2. Read size in context
The advertised size of scissors usually describes overall length, from the blade tip to the end of the handle. It does not necessarily tell you how much material the scissors cut in one stroke. Two tools of similar overall length can have different handle proportions and different usable blade lengths. When a product gives both measurements, read them separately.
A longer pair can cover more of a straight line before you open the blades again. That may feel useful when cutting larger fabric pieces. It also takes more room on the table and may feel less nimble around a tight curve. A shorter pair brings the cutting area closer to your hand, but it can require more strokes across a long piece.
Choose a size you can open and close comfortably. Your fingers should not feel trapped in the loops, and you should not need to stretch your hand to complete an ordinary cut. If you already own scissors that feel comfortable, measure their overall length and compare their handle shape with the photographs of the new pair. That gives you a more useful reference than a number alone.
For example, our 8-inch all-steel fabric shears have a separately stated 3.5-inch blade. The 8.5-inch and 9.5-inch titanium fabric shears offer different overall sizes within a familiar style. Those measurements help narrow the choice; your hand size, cutting surface and usual materials should make the final decision.
3. Choose fabric shears around your sewing routine
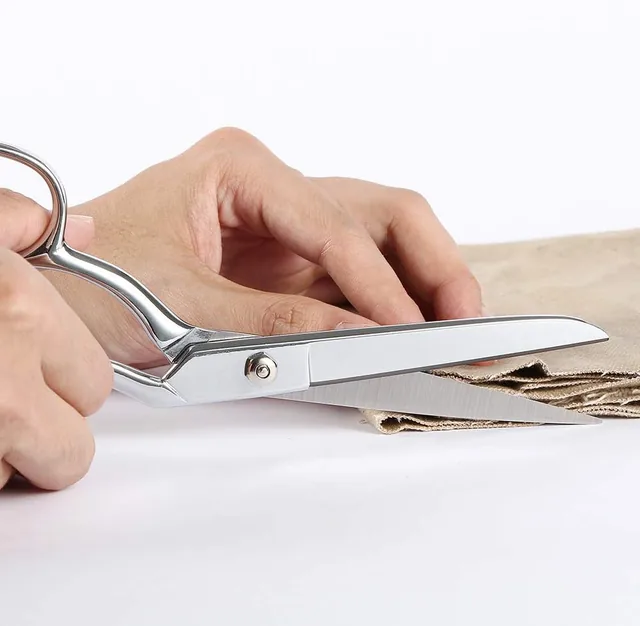
For sewing, think about the space between your hand and the table. A bent handle lets the lower blade work close to the surface while the handle stays above it. Supporting the fabric on a table makes it easier to follow a marked line without lifting the whole piece. Keep the free hand clear of the blades and move it as the cut advances.
An all-steel pair has a different feel from scissors with cushioned plastic handles. Neither description tells you which you will prefer. Look at the size of the finger loops, the shape around the thumb and the amount of material between the loops and the pivot. Those visible details often explain why two similar-looking pairs feel different in use.
Our titanium-coated fabric shears add a distinctive blade finish and soft inner handle rings. The 8.5-inch sizes work as an everyday sewing option; the longer 9.5-inch navy-and-yellow pair gives you another choice for broader cutting work. Do not assume that a longer or heavier pair is automatically better. A controlled cut with a comfortable tool is the goal.
A spring-action design changes how you move your hand. The blades reopen after each squeeze, so your fingers do not have to reopen two loops on every stroke. Our 10-inch spring-action fabric scissors also have a storage lock. Release the lock before work, keep the fabric supported and secure the blades again before putting the tool away.
Before cutting the final piece, try the scissors on a scrap from the same fabric. Use the same number of layers you plan to cut and check the result. Fabric thickness, weave and movement all affect how a cut feels. Use your test cut to choose a manageable stack. Reduce the number of layers if the blades drag or the fabric shifts.
If the fabric folds between the blades, stop and check the setup. The material may need better support, the cut may be too large for the tool, or the blades may need attention. Forcing the handle harder is not a good substitute for understanding the problem. Reduce the stack and try a controlled cut on a scrap before continuing.
Give fabric shears a dedicated storage spot. Keep a separate household pair nearby for tape, labels and packaging, so the fabric pair stays ready for the next project.
4. Look beyond the size of kitchen shears
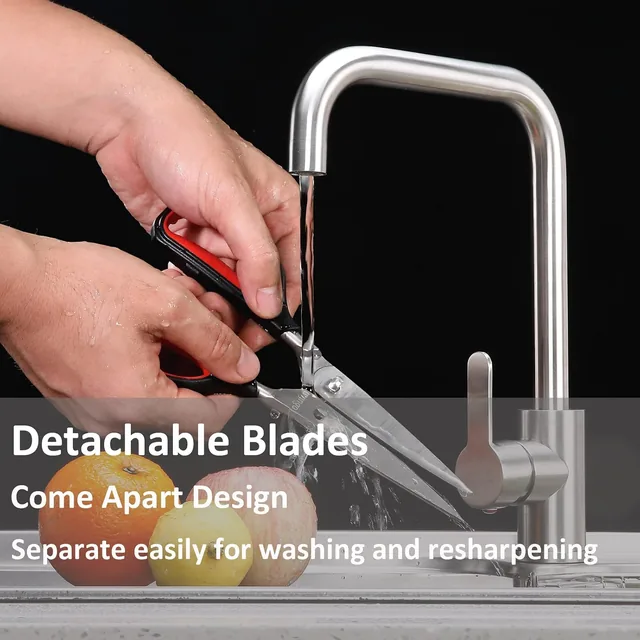
Food preparation puts cleaning access high on the list. Come-apart kitchen shears separate into two pieces, making it easier to reach the pivot area. Our all-steel, comfort-grip and two-pack kitchen options include detachable designs. Follow the instructions for the exact pair, handle the separated blades carefully and check that they are fully reconnected before the next use.
A micro-serrated edge has small teeth that help hold slippery material during a cut. You can see this detail in the product photographs of suitable kitchen models. A straight edge has a different profile. Neither feature removes the need for a steady board and careful hand position. Keep your supporting hand away from the line of travel.
Handle size matters when the ingredients are awkward or your grip is wet. Broad loops and cushioned areas give your fingers room, but you should still dry your hands and the handle before cutting. A textured or soft grip is a useful feature; it is not a reason to work with an unstable hold.
Poultry shears may use a longer handle, curved blade or locking mechanism. Check the photographs to understand how the tool opens and how it closes for storage. Our locking stainless-steel and titanium poultry styles differ from a conventional two-loop kitchen pair. Choose between them according to the preparation you regularly do and the handle you can control comfortably.
Keep food scissors separate from general household scissors. Wash them after food preparation, pay attention to the pivot and dry them thoroughly. Follow the care instructions for the selected model: a statement about dishwasher use for one pair does not automatically apply to another. Where hand washing is recommended, use that approach rather than assuming all steel tools share the same care routine.
Some kitchen handles include bottle-opening or nut-cracking features. Use the intended part of the tool for those jobs. Do not use a blade tip as a pry bar or twist the cutting edges against a hard object. If the material resists a comfortable cut, stop and use a tool designed for that task.
5. Build a useful household set
Everyday scissors tend to move around the house. A pair starts at the desk, gets borrowed for wrapping and eventually disappears into a kitchen drawer. A multipack is useful when you want a pair in more than one place. It can also help separate adhesive work from cleaner paper and ribbon projects.
Our all-purpose sets include stainless-steel, nonstick-coated and pastel titanium-coated options. Compare the number of pairs and the handle style before choosing. If the scissors will mostly cut wrapping paper, a comfortable straight blade may matter more than an extra feature. If tape and labels are regular jobs, look at the nonstick office pair.
A nonstick coating is intended to help with adhesive tasks. It does not mean residue can never collect on the blades. Wipe the tool after use and follow the care directions. Avoid scraping the blade with another metal tool or using an abrasive method that may damage its surface.
For a shared household set, assign a place and a purpose to each pair. Keep one near gift wrap, another with craft supplies and another at the desk. Different handle colors can make that system easy to remember. The point is to find the right pair when you need it, rather than adding more tools to an already crowded drawer.
All-purpose does not mean suitable for every material. Paper, thin card and light craft materials are different from thick wire, sheet metal or a hard plastic part. Read the selected product's intended uses and stop if a cut requires excessive force. A dedicated tool is a better choice when the material falls outside ordinary household cutting.
6. Match children's scissors to the child
Begin with the hand the child uses for cutting. A left-handed design is a more relevant choice for a left-handed child than simply choosing a different handle color. Our left-handed kids set is identified separately from the other school scissors. Read that label instead of assuming every small pair works the same way.
Then consider control and tip shape. Blunt-tip scissors are a common starting point for simple paper shapes. Pointed tips allow a finer starting point, but they also demand more care. Choose a design suited to the child's experience, the activity and the instructions supplied with the product. An age indication is only one part of that decision.
A comfortable handle should allow the child to hold the scissors without squeezing the loops around their fingers. Give them a stable table, room to position the paper and a short, manageable line to cut. Watch how they move the paper as well as how they move the scissors. A difficult setup can make a suitable tool feel awkward.
Adult supervision is still necessary with blunt tips and protective covers. The edge cuts even when the end is rounded. Keep the activity seated and controlled, close the blades when passing the tool and put the cover back on after use. Store all scissors in a place controlled by an adult when the session is finished.
For siblings or a small craft group, a three-pack helps keep each child's tools together. Check that every child receives a pair suited to their cutting hand and current ability. A colorful set makes the table cheerful, but the practical fit comes first.
7. Keep personal-care tools separate
Grooming scissors have a smaller blade and handle than household scissors. Look at the actual tip profile: a curved blade approaches the work differently from a straight one, and a wider blade differs from a narrow detail profile. Our curved personal-care options have separate product pages so you can compare those visible details before choosing.
Use a small grooming pair slowly, in good light and with a clear view of the cutting point. Keep pointed tips away from eyes and avoid cutting irritated or living skin. These are personal-care tools, not a substitute for professional advice when a nail or skin problem needs attention.
Clean the scissors before and after use, dry them and keep them in a dedicated place. Do not share the same pair between grooming, food and craft materials. A polished finish makes the surface easy to inspect; it does not make cleaning unnecessary.
8. Care for the edge and the next cut
After a cutting session, check the blades and pivot for loose fibers, paper dust, adhesive or food residue. Clean according to the instructions for the particular model. Different coatings, handle materials and detachable mechanisms can require different care. When instructions are unclear, avoid harsh chemicals or an improvised sharpening method.
Dry the tool before storing it. Pay attention to the area around the pivot and inside any handle cover where moisture can linger. Close the blades, use the supplied guard where available and engage a storage lock if the model has one. Keep the scissors where the sharp edge will not be knocked against other tools.
Do not tighten or loosen a pivot simply because the scissors feel different from another pair. A riveted pivot and an adjustable screw are not interchangeable designs. Check the instructions first. If the blades become damaged, loose or difficult to control, stop using the scissors until the condition has been assessed.
Sharpening also depends on the blade. Serrations, curves and coatings can make an ordinary household sharpener unsuitable. Ask a qualified sharpening service whether it can handle the particular blade style before proceeding. Regular cleaning and appropriate use are simple habits that belong in every routine, regardless of whether a blade can later be sharpened.
9. Make the final choice
Make a short list with three details: the material you cut most, the handle you prefer and the size you can control. Use the category pages to compare suitable tools, then open the product gallery. Look at the open blade, the grip and any storage or cleaning mechanism rather than judging only the first product photograph.
Check the selected option carefully. A product name can describe a family that includes more than one length, color or pack size. On this site, each page identifies the particular option shown. Confirm those details again in the purchase tab, along with the final price, availability and delivery information.
Compare the price for the exact size and pack you want, and confirm the final amount before ordering. A pair you already find comfortable can be a useful reference for the size and grip of your next scissors.
The best starting point is an ordinary task done comfortably: a clean paper edge, a supported fabric line or a kitchen tool that is easy to wash. Choose for that task, keep the pair ready and let the rest of your attention go to what you are making.
Find your next pair
Compare the LIVINGO collection by purpose and see the details up close.
Open the scissor finder ↗